Building Your Own Stove
by Crash325
(Tucson, AZ USA)

Building your own stove: plans
Hi,
Here are some written instructions. Not so hot but will get you going. Feel free to ask any questions that are not answered here or need clarity.
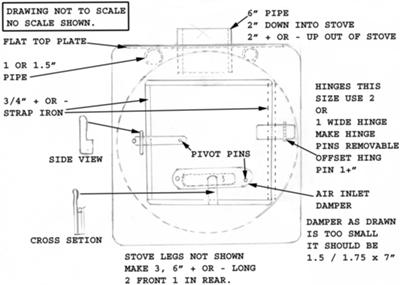
Number 1 goal was safety and #2 was simplicity, with a low parts count. I think both goals were accomplished. The plans and pictures will guide you through most of the construction and if you like I will detail the "Thimble" ( proper name - ( often called a 3 wall. ), that is where the stove pipe goes out the wall.
Almost any old hot water tank or similar will work and last almost forever.
#1 Cut bottom off of the tank about 25 or 26 inches is about the right length.. Keep cut as straight and clean as possible. My first choice for cutting is a 4.5" angle grinder, #2 Skill saw with a metal cutting blade, #3 a "Saws All" with a bi metal blade. Very slow but will work is a jig saw with a bi metal blade. A cutting torch is fast & easy, but will require a fair amount of grinding for a good fit on the front plate. NOTE: If your cut is real uneven, rather than doing a lot of grinding. Make a band out of 1/8" X 3/4" steel strap that fits snugly around the tank.. Even though this will require 2 welds, its a lot faster and easier than trying to fill large gaps or lots of grinding.
#2 Is cutting the front plate to size. Make it at least 1" larger on all sides than your tank diameter. I like it a little longer on the bottom of the stove. 3x16" Thick Plate is my first choice, but 1/8" or most anything thicker is fine.
#3 Before cutting out the door or air inlet weld plate to tank. I like to put any large holes in the tank at the bottom. Leave the top plate thickness extending above the top of the tank. Tack weld several spots, before welding solid all the way around.
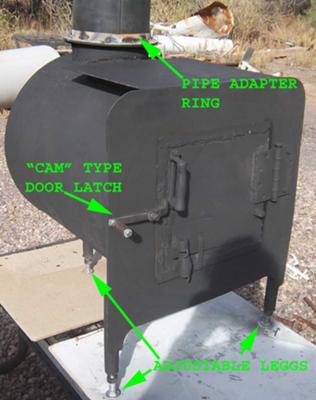
#4 Lay out the door and inlet damper on the front plate. It is a good idea to also mark out the hinge and latch spaces. Note: hinge pin is offset about 1" off the edge of the door. Once happy with the lay out, start cutting. This is where the 4.5" angle grinder with a cut off disk really shines. Note: Top of the door should be about 4" below the top of the tank.
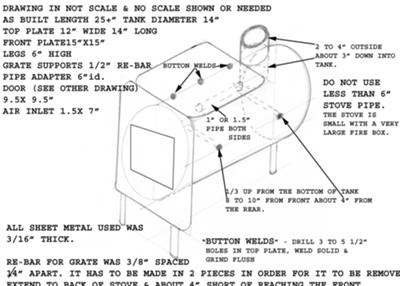
#5 Cut hole for the stove pipe *adapter at the rear of the tank. A torch works best for this job. Cut just a tiny bit small then grind out for a snug fit. Extend 1.5" into tank and weld solid. For a 14" to 17" diameter 6" stove pipe is fine. Larger stoves 7 or 8" is better. * Adapter is 6" ID water pipe. Do not use Zinc coated pipe. Zinc gives off poison gas when heated. Do Not use less than 6" pipe on any stove of this type.
#6 Drawings shows 2, 1/2" rebar supports for the fire grate. 1/4" Is more than strong enough and 3 supports are better than 2. Drill or burn holes for rebar supports about 2/3s down from top of tank. 1/4" Rebar is fine for grate construction.
NOTE: For maximum heat output add baffle as shown in stove #3. It should be about 2" below the stove pipe adapter and 1/3 to ½ the length of the stove. The baffle extends from the back of tank towards the front. Keep it fairly level or slightly higher in the front side. It does not have to seal or fit tight, a gap at the back of the tank is fine. A few good tack welds is all that is needed to hold it.
#7 Sealing the door. The best of all the sealers that I have tried is "Dap FB-136 ". It dries hard, but not as brittle as furnace cement. Apply a generous amount to the strap joint on the hinge side of the stove body. The top, bottom and front of door (latch side) again apply a bunch FB-136 in the joint. Slip a plastic shopping bag over the door covering all sides. Shut the door and let dry for a few hours. Remove bag and let it dry & harden some more.
When stove is complete and Before installing your stove, you should fire it up a few ( 3 or 4 ) times. Going through some heating and cooling cycles any bad welds and other problems will show up. Burn it real hot, then choke it down and force it to smoke. Any leaks or bad seals will show up then.
Have Fun,
Jim
For more information and / or pictures contact skystone at nethere dot net.
Here is a good link to check our.
Http://www.woodheat.org/tips/technique.htm
Join in and write your own page! It's easy to do. How? Simply click here to return to DIY Stoves.


